前回 ミサイル占いを作ろう のつづきです。
画像をアップロードして環境を作り、画像を表示するところまでやりました。
ターゲットを表示する
ターゲットとなるゴーストと犬の表示をします。
でも実際の敵は、ゴーストのみです。
Target というクラスを作ります。
前回のゲームでは、玉のクラスを作りましたね。
構成はほぼ同じです。
let dog, missile, ghost;

function preload() {
  dog = loadImage('dog.png');
  missile = loadImage('missile.png');
  ghost = loadImage('ghost.png');
}

function setup() {
  createCanvas(400, 400);
}

function draw() {
  background("#eaf4ff");

  image(dog, 50, 50);
  image(ghost, 150, 50);
  image(missile, 250, 50);
}

class Target {
  constructor(id) {   // idで表示位置と絵を変える
    this.x = (id % 8) * 58;
    this.y = Math.floor(id / 8) * 60 + 40;
    this.img = ghost;

    this.del = false; // 削除フラグ
  }
  delFlg() {  // 削除フラグ取得
    return this.del;
  }
  disp() { // 表示
    image(this.img, this.x, this.y);
  }
  move(px, py) { // 移動と当り判定
  }
}
Target クラスは作りました。しかし、実体を作ってないので表示も何もできません。
インスタンス化して次のようにしたいと思います。
問題です。
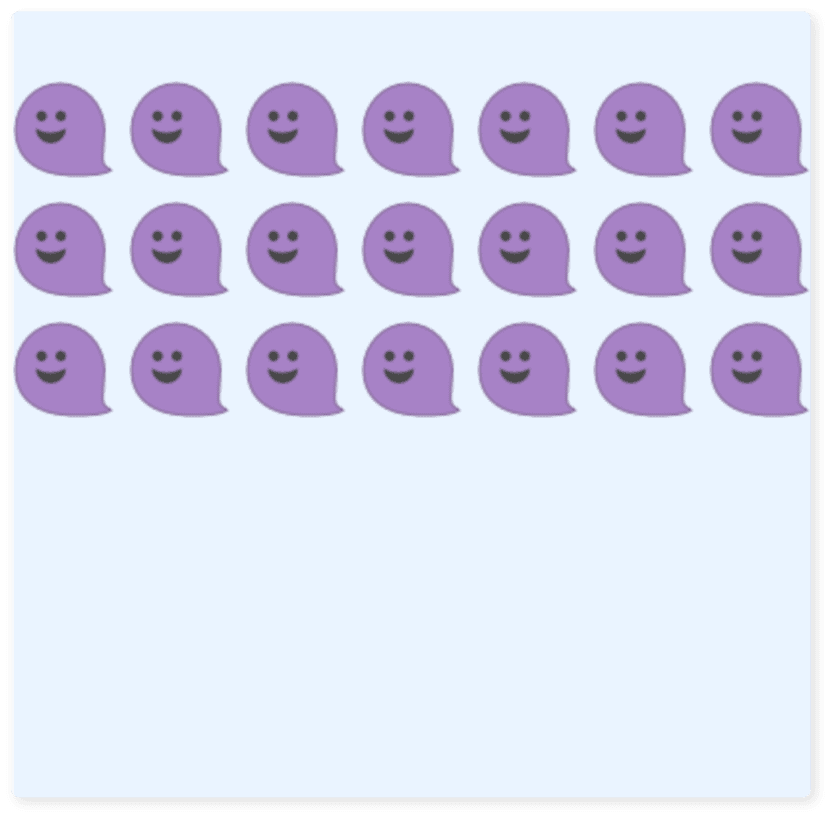
targets という配列変数を作って
Target をインスタンス化(24個)して表示してください。
ヒント:前回の玉クラスと違う点は、引数があることです。
例)targets[i] = new Target(i);
let dog, missile, ghost;
let targets = [];

function preload() {
  dog = loadImage('dog.png');
  missile = loadImage('missile.png');
  ghost = loadImage('ghost.png');
}

function setup() {
  createCanvas(400, 400);

  for (let i = 0; i < 24; i++) {
    targets[i] = new Target(i);
  }
}

function draw() {
  background("#eaf4ff");

  for (let i = 0; i < 24; i++) {
    targets[i].disp();
  }
}

class Target {
  constructor(id) {   // idで表示位置と絵を変える
    this.x = (id % 8) * 58;
    this.y = Math.floor(id / 8) * 60 + 40;
    this.img = ghost;

    this.del = false; // 削除フラグ
  }
  delFlg() {  // 削除フラグ取得
    return this.del;
  }
  disp() { // 表示
    image(this.img, this.x, this.y);
  }
  move(px, py) { // 移動と当り判定
  }
}
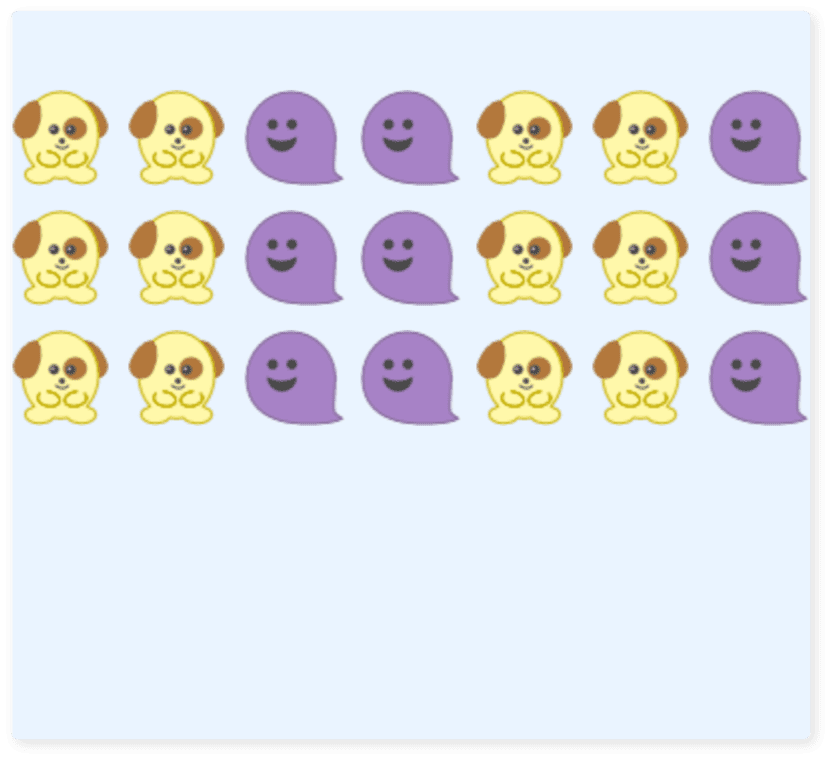
そうそう、犬の表示を忘れていました。
Target クラスを次のように変更してください。
class Target {
  constructor(id) {   // idで表示位置と絵を変える
    this.x = (id % 8) * 58;
    this.y = Math.floor(id / 8) * 60 + 40;
    if (id % 4 < 2) {
      this.img = dog;
    } else {
      this.img = ghost;
    }

    this.del = false; // 削除フラグ
  }
  delFlg() {  // 削除フラグ取得
    return this.del;
  }
  disp() { // 表示
    image(this.img, this.x, this.y);
  }
  move(px, py) { // 移動と当り判定
  }
}
引数idを4で割り、余りが 0 か 1 なら犬、それ以外はゴーストに設定します。
実行した画面です。
ターゲットを移動する
ターゲットを移動する仕組みを入れます。
移動の基本は、表示座標に移動量を加算することです。
+1 すれば右へ移動し、-1 すれば左へ移動します。(x軸の場合)
それから、ターゲットが画面外へ出たときは反対側から出現させます。
右移動しているものは 406 以上右へ行ったら、-58 の位置へ戻します。
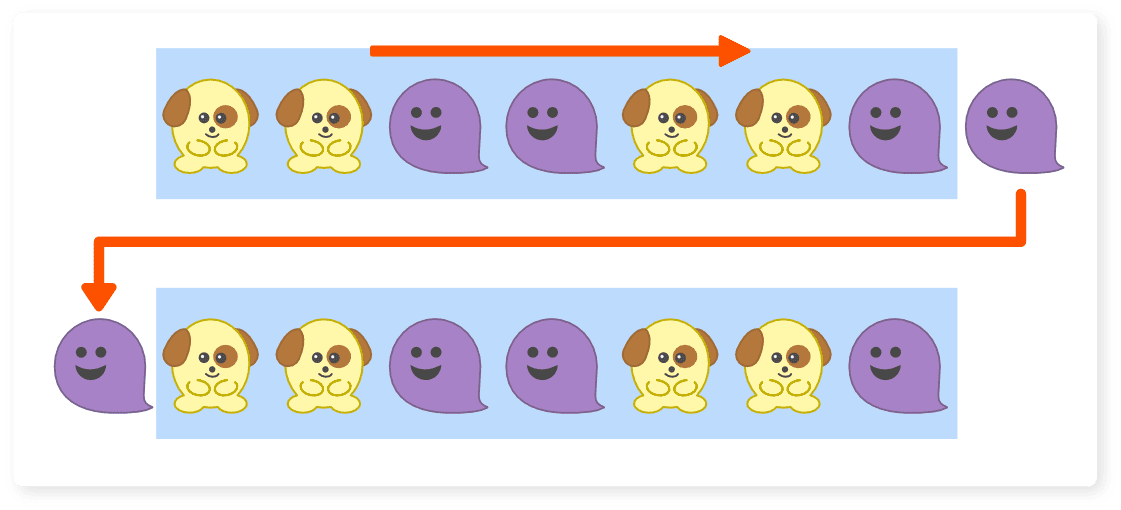
左移動しているものは -58 より左へ行ったら、406 の位置へ戻します。
これらを実現するために、下のプログラムが必要になります。
    targets[i].move(0, 0);

    this.vx = 1;  // 移動方向
    if (this.y == 100) this.vx = -1;

   this.x += this.vx;
    if (this.vx > 0) {
      if (this.x > 406) this.x = -58;
    } else {
      if (this.x < -58) this.x = 406;
    }
それでは問題です。
上記のプログラムを正しく組み込んでください。
ヒント:前回のゲームを参照。
function draw() {
  background("#eaf4ff");

  for (let i = 0; i < 24; i++) {
    targets[i].move(0, 0);
    targets[i].disp();
  }
}

class Target {
  constructor(id) {   // idで表示位置と絵を変える
    this.x = (id % 8) * 58;
    this.y = Math.floor(id / 8) * 60 + 40;
    this.vx = 1;  // 移動方向
    if (this.y == 100) this.vx = -1;
    if (id % 4 < 2) {
      this.img = dog;
    } else {
      this.img = ghost;
    }

    this.del = false; // 削除フラグ
  }
  delFlg() {  // 削除フラグ取得
    return this.del;
  }
  disp() { // 表示
    image(this.img, this.x, this.y);
  }
  move(px, py) { // 移動と当り判定
    this.x += this.vx;
    if (this.vx > 0) {
      if (this.x > 406) this.x = -58;
    } else {
      if (this.x < -58) this.x = 406;
    }
  }
}
実行すると次のように動きます。
移動の条件分岐で 406 や -58 という数はどこから出てきたの?
と思っている人もいることでしょう。
それはキャラを配置する計算式を見てください。
this.x = (id % 8) * 58;8個目のキャラは 7*58=406 の位置に配置されます。
画面サイズは 400 なので、完全に外へ出て見えない状態ですよね。
左へ戻すとき画面外から出すには、キャラ同士の間隔は 58 なので -58 にする必要があります。
ミサイルの表示
プレイヤーであるミサイルを表示します。
Player というクラスを作ります。
表示と移動、他に発射も考えた構成にしておきます。
function draw() {
    // (略)
}

class Player {
  constructor() {
    this.x = 200;
    this.y = 333;
    this.vy = 0;
  }
  launch() { // 発射
  }
  disp() { // 表示 (絵の幅32px)
    image(missile, this.x - 16, this.y);
  }
  move() { // 移動
    this.x = mouseX;
  }
}

class Target {
    // (略)
}
ミサイルの表示を見てください。ここです。
image(missile, this.x - 16, this.y);this.x - 16 としているのは絵の基点を真ん中にするためです。
絵の幅は 32 なので -16 すると真ん中になります。
理由はあとで説明します。
それでは問題です。
pl という変数を用意して、ミサイルの表示と移動の処理を組み込んでください。
let dog, missile, ghost, pl;    // plを追加
let targets = [];

function preload() {
  dog = loadImage('dog.png');
  missile = loadImage('missile.png');
  ghost = loadImage('ghost.png');
}

function setup() {
  createCanvas(400, 400);

  for (let i = 0; i < 24; i++) {
    targets[i] = new Target(i);
  }
  pl = new Player();
}

function draw() {
  background("#eaf4ff");

  for (let i = 0; i < 24; i++) {
    targets[i].move(0, 0);
    targets[i].disp();
  }
  pl.move();
  pl.disp();
}

class Player {
  constructor() {
    this.x = 200;
    this.y = 333;
    this.vy = 0;
  }
  launch() { // 発射
  }
  disp() { // 表示 (絵の幅32px)
    image(missile, this.x - 16, this.y);
  }
  move() { // 移動
    this.x = mouseX;
  }
}

class Target {
    // (略)
}
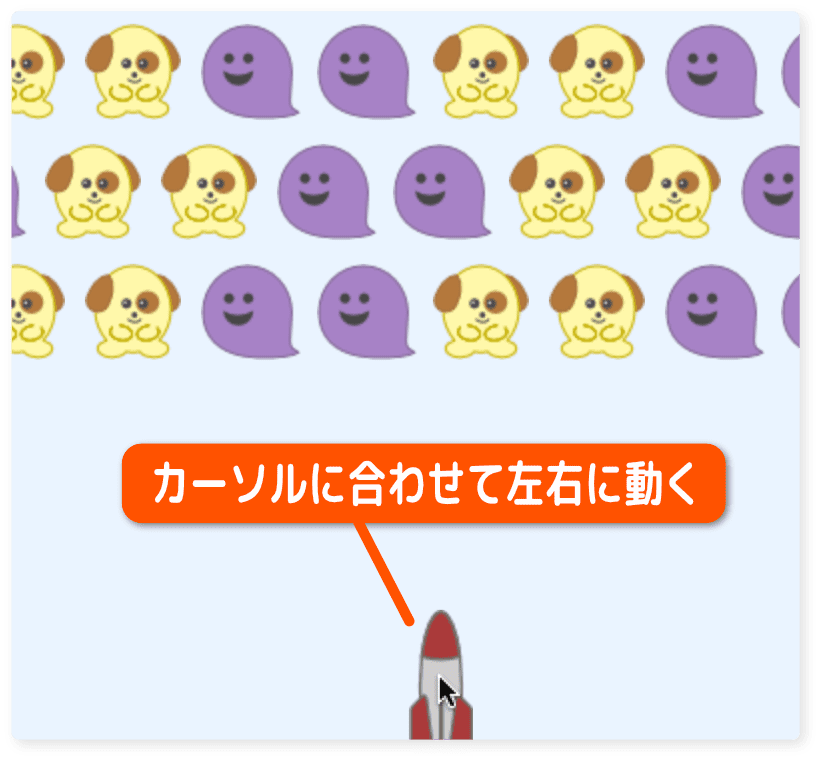
実行してみましょう。
マウスカーソルに合わせて、ミサイルが左右に動きます。
ミサイルの絵を -16 していた件ですが、次を見てください。
右の絵は this.x でそのまま表示した場合です。
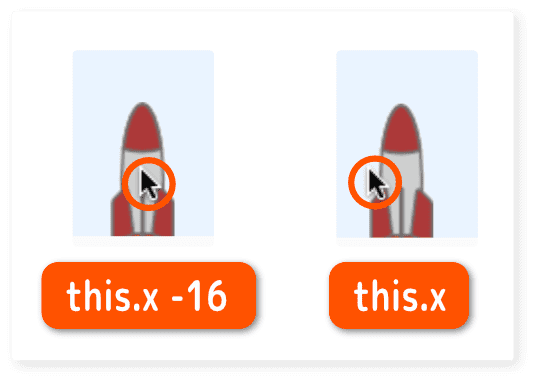
ご覧の通り、-16 しないときはカーソルが左側にあります。
操作してみると分かるのですが、何か違和感がありますね。
絵をセンタリングすることで違和感がなくなるのなら、対応した方が良いです。
ミサイルの発射
マウスをクリックしたらミサイルを発射させます。
Player クラスにメンバ変数 fire を追加します。
未発射なら false 、発射中なら true にします。
function draw() {
    // (略)
}

class Player {
  constructor() {
    this.x = 200;
    this.y = 333;
    this.vy = 0;
    this.fire = false;
  }
  launch() { // 発射
    this.fire = true;
  }
  disp() { // 表示 (絵の幅32px)
    image(missile, this.x - 16, this.y);
  }
  move() { // 移動
    this.x = mouseX;
    if (this.fire) { // 発射中
      this.vy += 0.3; // 加速させる
      this.y -= this.vy;
    }
  }
}

function mousePressed() {
  pl.launch(); // ミサイル発射
}

class Target {
    // (略)
}
マウスの左ボタンを押したとき呼ばれる mousePressed() を使います。
クリックした瞬間、処理が行われます。
function mousePressed() {
  pl.launch(); // ミサイル発射
}
似たような処理で mouseClicked() というのがあります。
これはマウスがクリックされた時に呼ばれます。
つまり、ボタンを押してから離すタイミングで呼ばれます。
シューティングやアクションには向きません。
ボタン的な操作のとき使います。
縦の移動処理は this.y を変更していきます。
this.vy に毎回 0.3 追加することで、ミサイルを加速させます。
    if (this.fire) { // 発射中
      this.vy += 0.3; // 加速させる
      this.y -= this.vy;
    }
実行すると画面の外へ飛んでいってしまいます。
リセットして手前に戻す必要がありますね。
そこで初期配置と初期化を init() というメソッドにします。
クラス Player を次のように変更しましょう。
class Player {
  constructor() {
    this.x = 200;
    this.init();
  }
  init() {  // 初期配置と初期化
    this.y = 333;
    this.vy = 0;
    this.fire = false;
    this.reset = false;
  }
  launch() { // 発射
    this.fire = true;
  }
  disp() { // 表示 (絵の幅32px)
    image(missile, this.x - 16, this.y);
  }
  move() { // 移動
    this.x = mouseX;
    if (this.fire) { // 発射中
      this.vy += 0.3; // 加速させる
      this.y -= this.vy;

      if (this.y < -200) {
        this.init(); // 初期配置に戻す
      }
    }
  }
}
ミサイルが画面外へ出て、それを戻す処理を追加しています。
ミサイルの高さが 80 なので -80 より小さければ画面外へ出たことになります。
-200 としたのは、手前に戻すとき少しだけラグ(遅延)を入れたかったからです。
      if (this.y < -200) {
        this.init(); // 初期配置に戻す
      }
次回につづきます。